SNOW REST connectivity

SNOW REST connectivity network icon


Verify ServiceNow test/production  environment connectivity.  Are you ready to begin the checks for ‘SNOW REST connectivity’?


Verify the following pre-requisites are met before proceeding:

Proxy

TEST/PROD ServiceNow (SNow) URL(s)

ID

Password


High level outline:

Verify network connectivity via proxy, using SNOW URL’s, ID, password

Verify CredentialManager Snapin installed

Setup credentials in CredentialManager


Verify network connectivity via proxy, using SNOW URL’s, ID, password

Determine the SCOM notification account being used, see blog for details.

RDP to SCOM MS using notification account.

Open PowerShell as administrator

Verify network connectivity pasting command into PowerShell window

Example SNOW URL JustinTime.servicenowservices.com

Test-NetConnection -ComputerName JustinTime.servicenowservices.com -port 443

Test-NetConnection -ComputerName JustinTime.servicenowservices.com -port 443 -proxy ##PROXY##


Successful connectivity

PS C:\MonAdmin\SCRIPTS> Test-NetConnection -ComputerName servicenowservices.com -port 443

ComputerName     : servicenowservices.com

RemoteAddress    : 199.91.136.115

RemotePort       : 443

InterfaceAlias   : Ethernet 2

SourceAddress    : 10.0.0.30

TcpTestSucceeded : True


Verify CredentialManager Snapin is installed

Best practice – Encrypt credentials on SCOM MS to prevent cleartext in scripts.  To begin, this includes details to verify SnapIn, verify credentials stored, store credentials.


Verify CredentialManager Snapin is installed

RDP to SCOM MS server(s) as SCOM Notifications SVC account with SA access

Open PowerShell as administrator

Paste command(s) into PowerShell window to test network connectivity to SNOW environments

# Verify Credential Manager snap in installed

$CredMgrModuleBase = Get-Module -Name CredentialManager

if ( $Null -ne $CredMgrModuleBase.ModuleBase )

{ write-host -f yellow “CredentialManager PoSH Module Installed, ModuleBase = $($CredMgrModuleBase.ModuleBase)” }

if ( $Null -eq $CredMgrModuleBase.ModuleBase )

{ write-host -f red “CredentialManager PoSH Module NOT Installed” }


CredentialManager snapin PowerShell output


Verify Stored Credentials on server

First, verify any credentials stored on server, specific to ServiceNow or not.  Second, we begin to use the Get-StoredCredential command. Third, we will setup the credential for REST integration, lastly verifying credential.

Setup Credentials for SNOW RESTAPI

RDP to SCOM MS server(s) as SCOM Notifications SVC account with SA access

Open PowerShell as administrator

Paste command(s) into PowerShell window to test network connectivity to SNOW environments


If no output, there are no credentials stored under the RDP login.

Get-StoredCredential

Commands specific to ServiceNow to verify credentials exist

$Credential = Get-StoredCredential -Target “ServiceNowCredential”

$Credential = Get-StoredCredential -Target “svc_rest_scom”

CredentialManager Get-StoredCredential Output

Alternate command to verify stored credential

Get-StoredCredential -Target “ServiceNowCredential”

CredentialManager Get-StoredCredential -Target "ServiceNowCredential"
CredentialManager Get-StoredCredential -Target “ServiceNowCredential”


Setup Credentials for SNOW RESTAPI

RDP to SCOM MS server(s) as SCOM Notifications SVC account with SA access

Open PowerShell as administrator

Paste the following commands to create stored credential:

New-StoredCredential -Target “ServiceNowCredential” -UserName “svc_rest_scom” -Password “##Password##” -Persist ‘LocalMachine’


New-StoredCredential output example


Verify credential being used by SCOM

$Credential = Get-StoredCredential -Target “ServiceNowCredential”

New-S


Therefore, network connectivity verified.  Lastly, encrypted credentials are stored in the SCOM notifications SVC account.  Continue the integration!

Configure SCOM agent from PowerShell

Configure SCOM agent from PowerShell


Ever have a need to configure a SCOM agent outside the SCOM Console GUI using SCOM.Management pack?   Tyson’s ‘SCOM Helper PowerShell module’ on monitoringguys.com may assist if you can update PowerShell and SnapIn’s.  If Tyson’s solution may not be an applicable solution in a locked down environment, the blog is a PowerShell script to manage agent configuration.


A shout out to Aris for his watchful eye testing and playing with this!


Configure SCOM agent from PowerShell

GitHub Download  https://github.com/theKevinJustin/SCOMAgentInstallApplication/

First, let’s begin the conversation.  Leverage the PowerShell script to configure SCOM/MOM agent per domain(s).  Whether DMZ forest(s), or multiple forests with SCOM gateways, the script will enable configuration management.  Alternatively, add script as a compliance check to the Configuration Management tool, or as a post install step to configure SCOM Agent (MomAgent.MSI) via application or package.  Third, utilize the PowerShell script where agent upgrade is a pre-req to resolve ‘a really old SCOM agent version’.   Lastly, the script also tests network connectivity, and verifies if configuration is requested/loaded.


It all starts with this object from the command:

$SCOMAgent = New-Object -ComObject AgentConfigManager.MgmtSvcCfg


Use the PowerShell script to:

Clean up extraneous management groups

Determine domain

Check network connectivity via test-netconnection

Reset healthservice to expedite agent configuration


Background

Because Kevin Holman blogged this almost 10 years ago in VB, and I’m pretty rusty in VB these days.  Check out Kevin’s blog titled ‘Using the agent scripting objects on a SCOM 2012 agent‘.


Documentation

Download https://github.com/theKevinJustin/SCOMAgentInstallApplication/

Kevin Holman’s blog for VB commands

Using the agent scripting objects on a SCOM 2012 agent

The agent configuration objects in MSDN http://msdn.microsoft.com/en-us/library/hh328967.aspx


Install SCOM agent MSI via command line

MECM application for SCOM agent MSI
Shout out to AT and Aris for his help with this!


Install SCOM agent MSI via command line and roll into a ‘SCOM agent’ MECM application package.

Why an application/package?  Many times, servers are built, and the IT Enterprise doesn’t find out device is NOT monitored until it’s involved in an outage.  Proceed to add to your Configuration management tool will provide a consistent configuration to avoid the ‘NOT monitored’ configuration.


While there are a few options to build out a MCM/MEM/MECM/SCCM application/package to install the SCOM agent on managed windows machines.  In August, I posted Neal’s updates to install/configure the SCOM agent.  Neal’s scenario works great for a new environment, and it’s simple PowerShell.  Also, if Neal’s scenario with PowerShell is NOT your preference, try the batch file below.  Another key point, the script has logic for multiple forests and SCOM gateways (to connect said forests).  Basically test the command line script, then roll into a MCM/MEM/MECM/SCCM application/package.  Have the SCOM agent added to task sequence which consequently includes the SCOM agent in the default build.


Install SCOM agent command line script

First – NOTE each line has no hidden line feed/carriage returns

Second – go through the variables before testing

Variables to review/replace:

##SCOMManagementGroup##      # SCOM Management group, seen in SCOM console on top left corner

SCOMManagementServer##     # SCOM management Server in primary domain
##SCOMManagementServerGW##     # SCOM first gateway
##SCOMManagementServerGW2##     # Second gateway
##Domain## as forest FQDN
##Domain2## as forest FQDN

Determine domain –

‘systeminfo | findstr /i /c:”domain” | findstr /i /c:”##Domain##”

Example Lab output

C:\> systeminfo | findstr /i /c:”domain” | findstr /i /c:”testlab”
Domain:      testlab.net


Third – Find/Replace ##hashtagged## variables and test away!

@echo off

cls

REM This script command line is for NEW installs of the agent (nothing prior)
REM Replace ##SCOMManagementGroup## SCOM Management group, seen in SCOM console on top left corner

ECHO Installing SCOM 2019 Windows Agent…

echo Determining domain….

REM Determine if machine is in DMZ….

systeminfo | findstr /i /c:”domain” | findstr /i /c:”DMZ” && (

echo Machine found to be in DMZ…installing for that enclave and management server: ##Domain2##”

echo.

%WinDir%\System32\msiexec.exe /i %~DP0MOMAgent.msi /qn USE_SETTINGS_FROM_AD=0 USE_MANUALLY_SPECIFIED_SETTINGS=1 MANAGEMENT_GROUP=##SCOMManagementGroup## MANAGEMENT_SERVER_DNS=##SCOMManagementServerGW## SECURE_PORT=5723 ACTIONS_USE_COMPUTER_ACCOUNT=1 NOAPM=1 AcceptEndUserLicenseAgreement=1

echo.

GOTO Logging)

REM Determine if machine is on domain….

systeminfo | findstr /i /c:”domain” | findstr /i /c:”##Domain##” && (

echo Machine found to be in ##Domain##…installing for that enclave and management server: ##Domain##

echo.

%WinDir%\System32\msiexec.exe /i %~DP0MOMAgent.msi /qn USE_SETTINGS_FROM_AD=0 USE_MANUALLY_SPECIFIED_SETTINGS=1 MANAGEMENT_GROUP=##SCOMManagementGroup##  MANAGEMENT_SERVER_DNS=##SCOMManagementServer## SECURE_PORT=5723 ACTIONS_USE_COMPUTER_ACCOUNT=1 NOAPM=1 AcceptEndUserLicenseAgreement=1

echo.

GOTO Logging)

REM Neither DMZ or domain joined found above…look for alternate domain(s)

REM These all share this same management server: FOREST2.FQDN and Gateway server

%WinDir%\System32\msiexec.exe /i %~DP0MOMAgent.msi /qn USE_SETTINGS_FROM_AD=0 USE_MANUALLY_SPECIFIED_SETTINGS=1 MANAGEMENT_GROUP=##SCOMManagementGroup## MANAGEMENT_SERVER_DNS=##SCOMManagementServerGW2## SECURE_PORT=5723 ACTIONS_USE_COMPUTER_ACCOUNT=1 NOAPM=1 AcceptEndUserLicenseAgreement=1

:Logging

ECHO Installing SCOM 2019 Windows Agent Completed…>> C:\Windows\Logs\SCOM2019Agent.log

time /t >> C:\Windows\Logs\SCOM2019Agent.log

date /t >> C:\Windows\Logs\SCOM2019Agent.log


Lastly enjoy!   In summary, I hope the ‘Install SCOM agent MSI via  command line’ script helps get the agent deployed faster, and more consistent!

MECM/SCCM Addendum pack

The 'MECM/SCCM Addendum pack' encompasses Endpoint Management which as of late, has taken on a number of names over the past few years.
The ‘MECM/SCCM Addendum pack’ encompasses Endpoint Management which as of late, has taken on a number of names over the past few years.

The ‘MECM/SCCM Addendum pack’ started from administrators and field engineers’ inputs on actionable/manual intervention required alerts.  While Endpoint Management has taken on a number of names over the past few years, monitoring the platform functionality has stayed pretty much the same.  The underlying application infrastructure is based on registry key discovery of installed roles.


Quick Download https://github.com/theKevinJustin/MCMAddendum


Tailor the addendum for environment

Add monitoring for MECM servers per health model through daily team report, alert cleanup, custom groups to address subscription objects, servers, custom disk and client cache cleanup workflows, and lastly service restart automation.

Quick overview

The classes and DataSource/WriteAction alert reports require updates to target server naming convention(s).  The alert report is most effective this way, only giving the administrator/AppOwner alerts relevant to owned/supported servers.   Why – make the changes most effective, i.e. alert when manual intervention required.

Workflows, classes, and MonitorType

Addendum Classes, DataSource, WriteAction, and Unit MonitorType to build out 'manual intervention required alerting'.


Update Discovery to find/replace hashtags

Leveraging Kevin Holman’s MP fragment find/replace common variables notated by the ##variable##, we begin by updating the ##MECMServerNamingConvention## with a regular expression of the servers involved with Configuration Management.

Subscription group example of relevant classes for subscription notifications for Application/System Owners.

Second, we update the disk specific alerts if drives fill, where different amounts of space is required to alert before application/server crashes, different than the OS Logical Disk full composite alerts for % and MB free alerts.  These disk specific updates allowing administrator to get unique alerts for common disk full scenarios.

Disk specific updates allowing administrator to get unique alerts for common disk full scenarios.


Third, update MECM Group discoveries for various regular expressions.

MECM Group discovery updates for various regular expressions.


Lastly, review MECM Rules, Tasks, Monitor and Overrides for pack functionality.

MECM Rules, Tasks, Monitor and Overrides for pack functionality.


After updating relevant pieces, save file, move to SCOM MS, and Import.

My customers have loved this, hopefully this experience is shared!


Documentation

Kevin Holman MP fragments

Endpoint Management https://learn.microsoft.com/en-us/mem/endpoint-manager-overview

Microsoft System Center 2012 Configuration Manager Monitoring 5.0.8239.1010
Download https://systemcenter.wiki/?GetCategory=System+Center+2012+Configuration+Manager

MCM Addendum pack

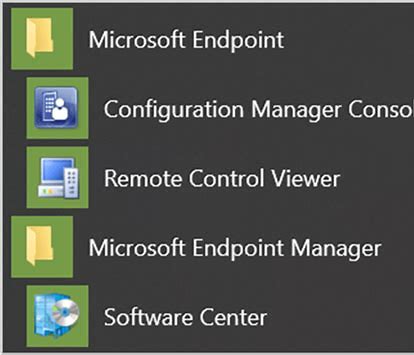
The MCM addendum pack helps monitor MEM. See start menu folder structure for Endpoint Manager software.

Rebranding central – MEM, EM, MECM, SCCM, Configuration manager, depending on the synonym, we’re referring to the same product.  Tune the most common critical alerts per the health model to warning.


QUICK DOWNLOAD https://github.com/theKevinJustin/MCMAddendum/

Background

Read Holman’s blog for more details.

Did you know – MCM discoveries are based on registry keys added with various role installs on windows servers.  These registry keys are typically under this path:  HKLM\SOFTWARE\Microsoft\SMS\Operations Management\Components


What capabilities does the ‘MCM addendum pack’ provide?

Quite simply, the pack provides warning severity overrides for common alerts, disable event collection rules.

9 overrides for monitors and rules included in addendum.


Includes warning severity changes for the following rules and monitors:

Monitors

BackupStatus.StatusMessage.Monitor

ReportingPoint.RoleAvailability.Monitor

SoftwareUpdatePoint.RoleAvailability.Monitor

SoftwareUpdatePointSync.AlertState.Monitor

Rules

ComponentServer.ComponentStoppedUnexpectedly.Event.Rule

SiteComponentManager – CanNotFindObjectInAD.Event.Rule, CouldNotAccessSiteSystem.Event.Rule

StateSystem.FailedToExecuteSummaryTask.Event.Rule

WsusConfigurationManager.FailedToConfigProxy.Event.Rule


Utilize the ‘MCM Addendum pack’

Download Kevin Holman’s MCM pack from GitHub.

Download the Addendum here, to get alerts where manual intervention required.

Save packs


Enjoy some acronym humor and ‘who moved my cheese fun!’

MECM PowerShell
MECM PowerShell


Import into SCOM & Enjoy!


If you need more capabilities, reach out on the blog or GitHub.


Documentation

Github repository here

SCCM management pack

Holman blog for MEM, EM, MCM, MECM, CM, ConfigMgr, Configuration Manager

Disk cleanup logic

Logical disk cleanup, most times is harder vs. smarter manual intervention required, why not smarter vs. harder?

‘Disk cleanup logic’ traditionally follows manual intervention.  Why would you want harder and manual?  This article will present options to clean up system and non-system disks, by leveraging largest root folder, API’s and more.  This is one step in the OS Addendum pack that needs explanation and can be tailored to applications where admins have regular manual cleanup actions.


Breakdown of Disk cleanup

We want to check system disks and non-system disks for different scenarios.  Figure out Disk free space, user profiles, largest folder on root of disk, IIS cleanup, and MECM/SCCM client cache clear API.  Second, utilize different behaviors depending on PowerShell version, application log(s) cleanup, and expand drive alerts when NO space after cleanup action.

Disk Free space

# Check Disk free space
#=====================
if ($Driveletter -eq “C” )
{
$CFreeSpace = gwmi win32_logicaldisk | ? { $_.DeviceID -eq “C:” }
$CFreeSpace.DeviceID
$CFreeSpace
  $DeviceDriveLetter = $CFreeSpace.DeviceID
$DeviceDriveLetter
# Check folder size after cleanup
#==========================
$BeforeSize = (Get-ChildItem “$DeviceDriveLetter” -Recurse | Measure-Object -Property Length -Sum ).sum
$Before = [math]::Round($BeforeSize/1GB,2)
    $DiskFreeSpace = [pscustomobject]@{
DeviceID = $DeviceDriveLetter
Size = [math]::Round($CFreeSpace.Size/1GB,2)
FreeSpace = [math]::Round($CFreeSpace.FreeSpace/1GB,2)
       }
$DiskFreeSpace
$SoftwareDistribution = (gci C:\windows\SoftwareDistribution | measure length -s).sum / 1Mb
# Debug
$SoftwareDistribution


Check Software Distribution for ConfigMgr/SCCM/MECM client

Checking software distribution path was an item for discussion where the folder was larger than 3GB, stemming from customer and field engineers  recommendations.


If ($DiskFreeSpace.FreeSpace -lt 15 )
{
# Audit Software Distribution
#==================================
If ( $SoftwareDistribution -lt “3000” )
{
Write-host “NO SME/SystemOwner/SysAdmin/Server Action required”
}

If ( $SoftwareDistribution -gt “3000” )
{
Write-host “SME/SystemOwner/SysAdmin/Server Action required, stopping Windows Update service, removing SoftwareDIstribution folder and restarting”
Get-Service -Name wuauserv | Stop-Service
Remove-Item -Path C:\Windows\SoftwareDistribution -Recurse
Get-Service -Name wuauserv | Start-Service
Write-host “Windows Update wuauserv service restarted after SoftwareDistribution directory removed”
}


Cleanup Application log folders

The nice part of this is you can reuse this by changing the path and deletion actions to tailor to customer environment.  The script comes in handy for VEEAM, SQL, IIS instances and log directory on multiple drives.


# Cleanup IIS log files
#=====================
#if ( Test-Path C:\inetpub\logs\LogFiles\W3SVC1 )
#{
## Years older than
#$HowOld = [DateTime]::Now.AddYears(-1)
#$RecentUse = [DateTime]::Now.AddDays(-90)
## Path to root folder
#$Path = “C:\inetpub\logs\LogFiles\W3SVC1\*.log”
## Deletion task
#get-childitem $Path -Recurse -Depth 1 -EA SilentlyContinue | where { $_.lastAccesstime -lt $RecentUse -and $_.CreationTime -lt $HowOld -and $_.LastWriteTime -lt $RecentUse } | remove-item -force -verbose
#}

Sample report alert output

Sample system disk cleanup report alert

Documentation

CleanMgr https://learn.microsoft.com/en-us/windows-server/administration/windows-commands/cleanmgr

Delete client cache the right way https://sccm-zone.com/deleting-the-sccm-cache-the-right-way-3c1de8dc4b48

MECM client cache cleanup PowerShell https://learn.microsoft.com/en-us/powershell/module/configurationmanager/invoke-cmclientaction?view=sccm-ps

SCCM Client Cache cleanup https://rzander.azurewebsites.net/sccm-config-item-to-cleanup-ccmcache/

Stack Overflow disk cleanup https://stackoverflow.com/questions/28852786/automate-process-of-disk-cleanup-cleanmgr-exe-without-user-intervention

ConfigMgr SMS role alerts

Microsoft Endpoint Configuration Manager

It’s that time to figure out the ConfigMgr SMS role alerts – If you are monitoring your SCCM/MECM environment, then you get role failure alerts.  Many times, the Operations Helpdesk, NOSC, NOC, SOC, etc. will get alerts when various roles fail on the Configuration Manager platform.  The common ask is why, what do you see, etc.  Much like Exchange, ConfigMgr internalizes the checks that are seen in the console as registry keys or events documenting said degraded component/feature.  Helping the MECM administrator understand the failure is key to decoding how to notify administrator, and when the helpdesk needs to act on ‘ConfigMgr SMS role alerts’.


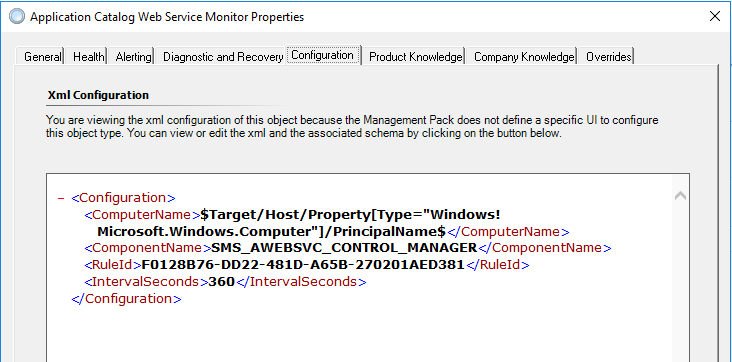
Example – MECM/SCCM looks at replication probe action state $Config/RoleName$

Example MECM Service Monitor for role alerts


The role check is based on a variable of the RoleName in a registry key that the application updates.


MECM Monitor Config
MECM Monitor Config


This is the origin of ConfigMgr SMS role alerts

HKLM:SOFTWARE\Microsoft\SMS\Operations Management\SMS Server Role\$Config/RoleName$\Availability State


Decoder ring:

1 is critical state

2,3,4 are warning states


If more details are needed, download SCCM/MECM Management Pack for SCOM here

Use Tyson’s SCOM Helper pack to unseal, and inspect XML.


Once you know the origin of the ConfigMgr SMS role alerts, you can begin tuning the MECM alerts to your environment.  Understanding role alerts will help both teams understand MECM application health.  First, use MECM application health to trend alerts/outages.  Second, leverage maintenance mode schedules, or MM scripts to NOT monitor for common administration tasks.  From my experience, the alerts are the result of MECM Admins maintaining the application – common actions like building application/package lists, cleanup actions, site maintenance, backups, etc.  Lastly, set up a subscription to notify after the tuning discussion.  See my blog on building a subscription for more details.

Getting started with OMS Update Compliance

Do you already have Upgrade Readiness or Device Health deployed in OMS?

If not, read this blog


Need to know more about Windows 10 patch compliance and don’t want to access Config Man (SCCM)?


Update Compliance is the answer!


It’s just as simple as adding the OMS Update Compliance Solution

Click on the Shopping bag (on left hand pane)

Scroll right to Update Compliance


Click Add (this will be Add not View, if you don’t already have the solution loaded)


Voila! (time elapsed as the solution gathers data every 12 hours )