Authentication Authentication Authentication! SCOM Web Console authentication settings
SCOM Web Console authentication settings discussion! Let’s go through standard IIS authentication settings like disabling Anonymous Authentication, and enabling Windows Authentication, AD Client Certificate Authentication, and binding providers (Negotiate before NTLM). Ready to begin?! A shout out to Alden Hatten as we worked through this and resetting the Web Console run here recently, that brought up the urgency to document.
Kevin Holman’s SCOM QuickStart guides for SCOM 2019, 2022 (Including WebConsole default setup steps)
SCOM Web Console Authentication settings defaults
RDP to server with SA or Local admin level account
Go into IISManager > Expand the tree to then click on ‘Default Web Site’
Click on Authentication
IIS Manager output for ‘Default Web Site’
IISManager Default Authentication settings
SmartCard aka AD Client Certificate Authentication defaults
In IIS Manager for the server > Click on Authentication
Verify AD Client Certificate Authentication is added and enabled.
IIS Manager Authentication, with SmartCard or Client Certificate Authentication
Windows Authentication
Set Authentication Providers order
From IIS Manager > Expand Default Web Site
Click on Authentication > Click on Providers at the top right
If Negotiate is not on top, highlight, and click Move Up button > Click OK to set. Restart IIS to make setting take effect ( also use iisreset from command prompt or PowerShell )
NOTE: Anonymous Authentication should be disabled!
IIS Manager Authentication, Windows Authentication, Providers, Negotiate on top
If screenshot is your setup, close the Providers window
After reviewing these authentication settings, you should be one step closer to encrypted authentication.
Use this post when the SCOM WebConsole gets flagged for HTTP Redirect. The IIS configuration is pretty easy to set up. When your Security team contacts you to resolve VulnID 121040, the steps below should resolve the compliance finding. Use the Microsoft learn site for more details.
Add HTTP Redirect role from Server Manager
Time to Configure ‘SCOM WebConsole HTTP Redirect’
RDP to server, open Server Manager
Click on Manage on top right
Click Next on the ‘before you begin popup’
Server Manager splash screen
Click Next
Server Manager Role Installation Type popup wizard
Click Next
Server Manager Destination Manager screen
Expand the ‘Web Server’ drop down menu
Server Manager Roles
Expand Web Server drop down menu
Expand Common HTTP Features
Check box for HTTP Redirection
Server Manager Roles expanding Web Server for HTTP Redirect
Click Next
Server Manager HTTP Redirection check box selected
Click Next at the Features tab
Server Manager Features window
Click Install to install the feature
NOTE the checkbox to ‘Restart if required is NOT selected’
Most change processes don’t allow this on the fly (unplanned outage)
Server Manager Selections window
Wait while the feature(s) install
Click Close once complete
Server Manager feature install in progress
Setup Redirection in IIS Manager
Open IISManager
NOTE If IISManager was open before the feature was closed, exit and open IISManager again. IISManager refresh does NOT make HTTP Redirect reappear (even if restarting IIS service).
Click on your webServer > Double click on HTTP Redirect
IIS Manager with HTTP Redirect
IISManager HTTP Redirect Default splash screen
Check the ‘Redirect requests to this destination:’ check box
Enter the WebConsole URL for your installation.
NOTE SCOM default WebConsole URL is http://<webserverName>/OperationsManager
Check the two (2) boxes for Redirect behaviors
IISManager HTTP Redirect configuration screen
Click Apply
Recommend restart/reboot of server (off hours) to apply configuration before having Security team scan server.
Verify HTTP Redirect after reboot
After reboot, verify current settings (shown are default)
Click on ‘Default WebSite’ dropdown > Select HTTP Redirect
Airplane movie – AutoPilot with SCOM Web Console settings
Makes me think of the scene from Airplane with the AutoPilot blow-up, similarly parallel to engineer experiences talking about the SCOM Web Console configuration. I’m ready to dispel some myths to document securing the ‘SCOM Web Console for authentication’
Quick outline
Knowledge Articles to aid with ‘SCOM WebConsole settings for authentication’
Setup ‘SCOM WebConsole settings for secure authentication’, access, and rendering methods. I’ve setup the web console role with defaults, then come back later. Holman’s quick start lets you complete the role with default HTTP setup. After that, we add an SSL cert for HTTPS. Thirdly, employ aliases, or F5 load balancers to simplify user experience accessing the console. Fourth, setup SmartCards to help secure, also Kerberos authentication/delegation.
Part 1 – Start with the SSL certificate for https
Setup the ‘SCOM WebConsole settings for authentication’, beginning with a SSL certificate request for the server(s) in question. Add any SAN names/aliases you want (if not load balanced).
NOTE:
Use CA Auto-Enrollment templates to simplify SSL request whenever an internal or external SSL certificate is required for your organization. Generally, external certificates require manual effort executing the certreq script.
Sample SSL certificate
SCOM Web Console SSL Cert details
Less typing means less typos
Below SSL certificate example with any SAN names/aliases (if not load balanced). Simplify the SCOM web console link to https://SCOM/ versus https://SCOMSERVERName/OperationsManager
IIS manager server certificates with SAN DNSName aliases included.
Part 2 – Add authentication Smart Card in IIS
Next! – I will set up SmartCard role in ‘SCOM WebConsole settings for authentication’. Additionally, review the Learn.microsoft.com site for IIS here.
Compatibility
Version
Notes
IIS 10.0
The <iisClientCertificateMappingAuthentication> element was not modified in IIS 10.0.
IIS 8.5
The <iisClientCertificateMappingAuthentication> element was not modified in IIS 8.5.
IIS 8.0
The <iisClientCertificateMappingAuthentication> element was not modified in IIS 8.0.
IIS 7.5
The <iisClientCertificateMappingAuthentication> element was not modified in IIS 7.5.
IIS 7.0
The <iisClientCertificateMappingAuthentication> element of the <authentication> element was introduced in IIS 7.0.
IIS 6.0
The <iisClientCertificateMappingAuthentication> element replaces the IIS 6.0 IIsCertMapper metabase object.
Add the Client Certificate feature for the SCOM Web Console
Let’s add SmartCard authentication capability.
Open Server manager >
Open Server manager
Click on Manage > Add roles/features (top right)
Scroll to the top right, and click on Manage, then ‘Add Roles or features’
Click Next twice to get to the Server Roles
Server Manager > Server Roles tab output
Server Manager > Server Roles
Expand Web Server drop down
SCOM Web Console Authentication installing Client Certificate Mapping role
Click the box to check ‘Client Certificate Mapping Authentication (Installed)’ and click Next twice (2) [ two times ]
Expand Server Manager > Web Server > Client Certificate Mapping Authentication
Click Install (mine is greyed out as it’s enabled)
Server Manager Features Install
Allow install to complete, server will prompt if reboot required.
NOTE: Either way, reboot is required to apply new authentication method.
Validate IISManager after reboot
Click on Authentication to verify ‘Active Directory Client Certificate Authentication’ is present and enabled.
IIS Authentication with Client Certificate Authentication (after role installed)
After reboot, verify ‘AD Client Certificate authentication’ method is enabled and visible.
From IISManager > Server > Authentication > Verify method is there and enabled
IIS Authentication with Client Certificate Authentication (after role installed)
Verify Default Web Site Authentication setup
Verify Default Web site has Windows Authentication enabled.
Navigation steps:
IIS Manager > Expand Sites > Default Web Site > Authentication
Windows Authentication should be enabled, others disabled
Default Web Site Authentication showing Windows Authentication ONLY enabled
Time to make the doughnuts again, new Security ODBC Vuln 175441 that needs to be mitigated. Not sure if you ever saw the commercials, but this is where my mind goes sarcastic humor and all. Whether you’re using ACAS/Tenable/Nessus for security scans, this may show up with your SCOM servers (MS, DB), and PowerBI Report Servers.
Let’s get started to upgrade ODBC
Action: Security scan shows a new ODBC Vuln 175441, that may impact SCOM or PowerBI Report Server talking with SQL servers.
Start with some documentation, to understand what and why…
Have Security run additional scan to verify resolved
What servers are vulnerable?
We’re focused on the ‘Security – ODBC Vuln 175441’
Begin by looking at your Security scanning tool output (PowerBI report pictured). I am also showcasing the PowerBI report, as this streamlines what the Security Admin has to provide when System Administrators (sysAdmin) reach out for debug/details.
ACAS/Tenable/Nessus scan PowerBI Report
In my case, I wanted to see what servers are impacted. The PowerBI Report has a built-in ‘Deep Dive’ tab to see the details from the scan/check. Click on the Deep Dive Tab, enter the PlugIn ID (175441 for ODBC) and hit enter. This breaks out what servers are vulnerable. Assess what servers are yours (my output simplified to show what I own with SCOM and PowerBI 🙂 Looking at the ‘NetBIOS Name’ column. Alternatively, the admin typically has the scan tool email XLS files.
Access your ACAS/Tenable/Nessus scan deep dive tab (or PowerBI Report) to see how many systems are vulnerable.
Save to share or common path to put file on affected server(s).
Once moved, login to affected server(s), typically RDP with Local Administrator equivalent admin ID
Open Windows Explorer > Copy ODBC MSI to server
Open PowerShell (as Admin) window > Go to path > Run ODBCMSI
PowerShell as Administrator steps
Now the ODBC popup window for install
Note the screenshots and progress prompts
Click ‘I accept’ radio button and then click ‘Next’
ODBC EULA splash screen
Click Next to move beyond the ODBC features screen
ODBC Features screen
Click on Install
ODBC Install prompt
Watch progress bar (maybe 1-2 minutes)
ODBC Install Progress bar
Click Finished
ODBC Install finished
Once the MSI installer window closes, it’s time to verify server Control Panel.
Verify server Control Panel shows update
Click on Start > Control Panel > Programs > Programs and Features
In the top right search bar, type ‘ODBC’ and hit enter to filter results.
Snapshot of Control Panel before
Control Panel with ODBC as the search string
Snapshot of Control Panel after
Hit F5 to refresh screen output
ODBC Control Panel after install
The one question is if version 17 has to be removed to clear vulnerability. Ran into this scenario with Java, as the update left old versions.
I typically reboot the server to reinitialize server to assess any impacts, as well as boot on the new drivers. For this instance, I coordinated my July server updates were installed to simplify my admin (as both require reboot!)
Have Security run additional scan to verify resolved
Typically SME has scheduled scans that run weekly, and can run scans on-demand. Depending on urgency, you can decide whether or not waiting is relevant.
Time to update PowerBI Report Server to PowerBI May 2023 update/install for PowerBI Desktop and Report Server!
Do you use PowerBI to render monitoring insights from SCOM, SolarWinds, ACAS/Tenable, ForeScout or more? In case you didn’t know, PowerBI Report Server is the on-premise solution where updates from the PowerBI Cloud Service make way to prem at least twice a year. Time to update to ‘PowerBI May 2023’ when you’re air-gapped, or just NOT to the cloud. This post is how to upgrade PowerBI Report Server and PowerBI Desktop to the latest version. This has been a few iterations in progress, and I couldn’t find any blog showing how to update these components. NOTE: MDE/Intune/MECM/EM tools can be used to package this easily enough, but it’s typically a very small subset of servers used.
Grab a snapshot of PowerBI Report Server and Desktop Before MSI update/install
Before we upgrade to ‘PowerBI May 2023 install’ MSI’s –
Open Control Panel > Programs and Features > Search for Report (and hit enter)
Windows Server, Control Panel, Programs and Features before install
Check PowerBI Desktop (shows before and after!)
Open Control Panel > Programs and Features > Search for ‘power’ (and hit enter)
PowerBI Desktop Windows Server, Control Panel, Programs and Features before install
Begin PowerBI Desktop update
Assuming you’ve downloaded the PowerBI updates and saved to relevant servers. Check PowerBI blog here, PowerBI Report Server page for the latest version.
PowerBI Desktop and PowerBI Report Server from PowerShell, Windows Server, Control Panel, Programs and Features before install
Confirm EULA
Click ‘I Accept’ check box and then Next to continue Desktop install
PowerBI Desktop EULA
Confirm Desktop Path
I changed to secondary drive to NOT fill up C: boot disk
PowerBI Desktop May2023 update path
Click Next to begin install
Click Next to begin install
PowerBI Desktop May2023 Next
Click Finish
Click Finish to complete update
PowerBI Desktop May2023 Finish
PowerBI Desktop Reboot required prompts
PowerBI desktop prompted twice for reboot required
Click OK
PowerBI Desktop required reboot prompt first time
Prompted again for reboot
PowerBI Desktop required reboot prompt
Click OK
PowerBI Report Server update
Begin PowerShell window for PowerBI Report Server exe update
Check Version prior to install
Click on Start > Control Panel > Programs > Programs and Features
Type Report (and hit enter)
Verify version
PowerBI Report Server before update
PowerBI Report Server update
Check what’s installed before update
Check Control Panel > Programs > Programs and Features > Report (hit enter)
PowerBI Report Server updated
Begin Report Server install/update
From PowerShell as Administrator window > Type .\PowerBIReportServer.exe
Hit enter
NOTE: Similar popup output to PowerBI desktop pictured below
PowerBI Desktop and PowerBI Report Server from PowerShell, Windows Server, Control Panel, Programs and Features before install
Choose Upgrade/Install PowerBI Report Server
PowerBI Report Server Upgrade/Install prompt
Accept EULA
Click on ‘I accept’ radio checkbox
PowerBI Report Server EULA prompt
Report Server update installing
Watch while PowerBI Report Server updates
PowerBI Report Server Install progress
PowerBI Report Server reboot required
PowerBI Report Server prompts for reboot – ‘Restart required’
Click Close to reboot server
NOTE: Optionally click on Restart. Validate PowerBI Report server service is running via services.msc, and then check the PowerBI Report Server URL specified is functional. This may still require server reboot!
PowerBI Report Server Restart Required
Additional verification of PowerBI Report Server install
Verify PowerBI Report Server updated from Windows Control Panel
Click on Start > Control Panel > Programs > Programs and Features
Type Power (and hit enter)
Verify the version number matches (unfortunately, Report Server does NOT list the version in the title)
If you’re responsible for security compliance with SCOM servers, there will be times when applications need to be upgraded. Current effort is Java vulnerabilities on your SCOM servers, current examples are plugIn ID’s 170161,166316. Compliance and Security are big deals, even in air-gapped networks. Why – even if external hacking risk is low, the security tools will cause administrative headaches when scanning weekly or more often. The scans can also be intrusive in nature, causing even more problems. For the Java vulnerabilities, when running some 3rd party tools, like Cisco UCS monitoring, Java is installed for the application to run. Java is like OS updates, comes up with periodic vulnerabilities popping up on your favorite security scanner software/tool (like Nessus/ACAS/Tenable+).
These specific vulnerabilities, the tool is looking for paths for Java 1.8.0+. Even after upgrading Java, the vulnerabilities still showed, requesting debug output, it showed two paths on C: (64 and 32bit paths).
Plugin Output:
Path : C:\Program Files (x86)\Java\jre1.8.0_341\
Installed version : 1.8.0_341 / build 8.0.341
Fixed version : Upgrade to version 8.0.361 or greater
Path : C:\Program Files\Java\jre1.8.0_341\
Installed version : 1.8.0_341 / build 8.0.341
Fixed version : Upgrade to version 8.0.361 or greater
In my case, the upgrade completed, but did not remove the old version 1.8.0_341 (vulnerable version)!
PS C:\Program Files\java> gci
Directory: C:\Program Files\java
Mode LastWriteTime Length Name
—- ————- —— —-
da—- 7/28/2022 6:27 AM jre1.8.0_341
da—- 3/15/2023 6:12 PM jre1.8.0_361
Verify Java version on affected server(s)
Verify install – whether you check from Windows Explorer for the C: drive path, or from Control Panel > Programs and Features > Installed
Java application from Programs and Features
NOTE multiple Java versions show installed on the server. For resolving the vulnerability, you’ll need to download latest update from Oracle here, install, and then remove the old versions (see that the 32 and 64 bit versions were installed)
From PowerShell as admin, go to the path where you saved the Java exe
Java installer splash screen
Click Close once Java installed
Java install completed
Additional validation step
From Event Viewer, Application Event Log, look for MsiInstaller events to validate Java install successful
Windows Application Event Log, looking for MSIInstaller events to validate Java install successful
For me, knowing that Cisco UCS application used java, I wanted to verify the alerts in SCOM, as well as the service restarted without issue.
Question example of two cartoon people discussing something. Both have thought bubble cartoons looming overhead.
Ever run through an event log scenario deciding ‘event collection vs. alert rule’ is the way to filter out the needle from the haystack? There’s a few ways to do this with Monitoring tools. If you’re cloud centric, a KQL query (assuming you’re collecting the event logs, if you’re using Operations Manager (SCOM), there’s a few ways to consume the events. SCOM ACS is basically a DB for collecting Security events, and typically is an unused feature in SCOM by most customers. Kevin Holman’s had many blog posts for ACS, testing the filter, as well as a management pack (MP) fragment (blog here, GitHub fragment library here).
Let’s walk through criteria deciding ‘event collection vs. alert rule’:
Do the event(s) happen often? If so, how often?
Can you filter the event description to limit the amount of gathered event?
Do you need match count or samples before action required? (i.e. count x events in y time)
Is there a regulatory or compliance requirement to collect every event?
Is this something you want to visualize with PowerBI?
For better visualizations, would the EventID help view/sort data in a tabular output? i.e. Think PowerShell property) as well as TimeRaised/TimeGenerated, and Event Description
Example – DC Security events
When there is a regulatory requirement to collect events, we need to decide ‘event collection vs. alert rule, and IF we can filter for specific pieces of the event. Holman has examples of alert parameters, and dynamic data, which are very useful to get the needles out of the haystacks. Depending on your goals, use event parameters, or leverage CustomFields in the alert to build required fields.
Depending on the requirements, event collection is useful to collect related EventID’s with RegularExpressions. Use Event rules WHEN action is required. Leverage Regular expressions help filter what we collect (via event collection or alert rule. By extension, utilize CustomFields in the alerts to help the presentation or SQL query towards a PowerBI report.
Lastly, let’s talk about the use of CustomFields to add additional data to the alert, but NOT in the event description (Holman’s blog here)
For the tabular view of alert data (from PowerShell as with SQL query of Alerts view, we might need to display the data, such as EventDisplayNumber, TimeRaised, Message, (alternate is Parameters, or UnformattedDescription). Additionally, check alert output details, from the SCOM MS in PowerShell via get-SCOMAlert -name “MonitorDisplayNameHere” | fl | more
Sometimes as the monitoring admin, you may be responsible to secure your servers, being told from Security/Cyber Teams about new vulnerabilities. The vulnerabilities may be from Tanium, ACAS, Tenable or other security tools. This article is how to help you secure related SCOM web console, and SSRS reporting sites against Unconstrained Delegation vulnerabilities CVE-2020-17049, also AD STIG V-36435.
First we need to identify IF this is a true finding.
Typically this comes from Server/SystemsAdmin with domain admin access:
After identifying SCOM servers with unconstrained delegation (scope of blog post is focused on SCOM in a hybrid scenario (prem/cloud), we need to resolve.
With domain administrator rights, open the Active Directory Users and Computers MMC snap-in.
In ADUC, change Find drop-down to Computers
In the Computer name text box, enter <SCOMServer> and click search
Right click the server in the results box > Select Properties.
Select the Delegation tab.
ADUC view of lab server delegation setting
Select Trust this computer for delegation to specified services only > Use any authentication protocol.
Under Services to which this account can present delegated credentials, select Add.
In the new dialog box, select Users or Computers.
Enter <SCOMServer>, and then select OK.
Click the Add button to add services
Select the w3svc and www processes
Select OK.
ADUC GUI adding services for delegation on SCOM server
Once set in AD, reboot server. Running ‘gpupdate /force’ may not apply AD changes to the server object.
After reboot, reach out to SCOM Admins to test webconsole authentication
From edge browser, go to SCOM web console, typically @ https://<SCOMServer>/OperationsManager
On the Monitoring tab, click on Active Directory dashboard on left
SCOM hotfix released for WebConsole/APM on SCOM2012R2 and above, time for another SCOM shot! Don’t forget your vaccination card 🙂
Let’s get started. Time to fix the vulnerability for ‘SCOM hotfix released for WebConsole/APM on SCOM2012R2 and above’. Read the support article, and assess what versions you have in your sandbox and production. Once assessed, it’s time to test/implement/verify the fix applied.
Just in case you forgot how to add properties in Windows Explorer…
In the columns (Name, Date modified, etc,) right click > More
Add file property
Hit F to move down to the F named details > hit check box for ‘File Version’ or click on File Version and hit space bar
Click on OK
Add file property File Version
Sort by ‘Date Modified’ Column
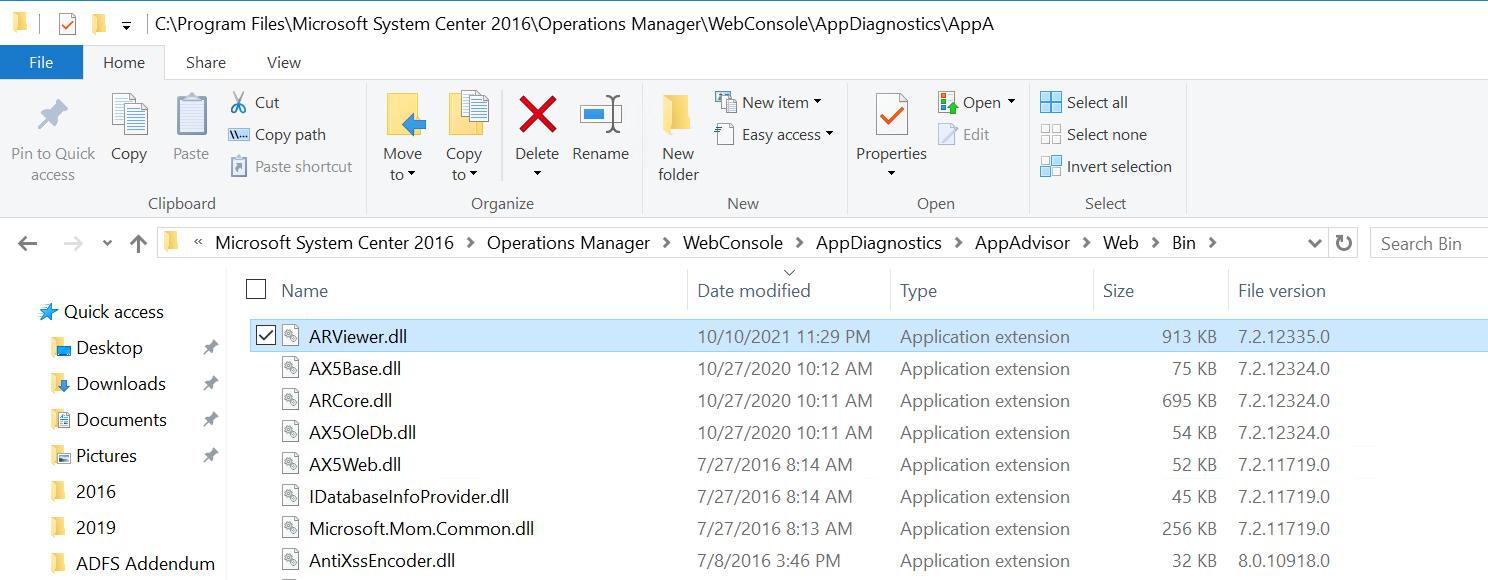
Verify File Version
File versions AFTER installing hotfix
Depending on which SCOM version you’re running, the path stays pretty much the same, and you want to verify that files were updated for the ‘SCOM hotfix released for WebConsole/APM’
SCOM2019
UR3 = 10.19.10505.0 > Hotfix file version = 10.19.10550.0
SCOM2016
UR10 = 7.2.12324 > Hotfix file version = 7.2.12335.0
Standard UR10 files are 8.0.10918.0
Voila > SCOM hotfix complete
Notify your Security team you’ve patched, because sometimes the scanner software isn’t accurately updated (where Security needs to open a case with their vendor!)
Complete: Patched environment for ‘SCOM WebConsole/APM on SCOM2012R2 and above’
Parse Events via PowerShell into table. Ever have need to parse an event, and grab a field from the event description, then perform some action after that?
Here’s some PowerShell that may help you first to create a table, then setup columns, gather data, then parse what you need, and run a command to then output to the table
To provide the best experiences, we use technologies like cookies to store and/or access device information. Consenting to these technologies will allow us to process data such as browsing behavior or unique IDs on this site. Not consenting or withdrawing consent, may adversely affect certain features and functions.
Functional
Always active
The technical storage or access is strictly necessary for the legitimate purpose of enabling the use of a specific service explicitly requested by the subscriber or user, or for the sole purpose of carrying out the transmission of a communication over an electronic communications network.
Preferences
The technical storage or access is necessary for the legitimate purpose of storing preferences that are not requested by the subscriber or user.
Statistics
The technical storage or access that is used exclusively for statistical purposes.The technical storage or access that is used exclusively for anonymous statistical purposes. Without a subpoena, voluntary compliance on the part of your Internet Service Provider, or additional records from a third party, information stored or retrieved for this purpose alone cannot usually be used to identify you.
Marketing
The technical storage or access is required to create user profiles to send advertising, or to track the user on a website or across several websites for similar marketing purposes.