SCOM WebConsole settings for authentication

Auto Pilot for SCOM web console
Airplane movie – AutoPilot with SCOM Web Console settings


Makes me think of the scene from Airplane with the AutoPilot blow-up, similarly parallel to engineer experiences talking about the SCOM Web Console configuration.  I’m ready to dispel some myths to document securing the ‘SCOM Web Console for authentication’


Quick outline

Knowledge Articles to aid with ‘SCOM WebConsole settings for authentication’

Configuring SSL certs and Smart Cards (this post)

Configuring Kerberos and AD delegation (next post)

Verifying WebConsole functionality blog posts – ReDirect, Authentication, SSL and Bindings

Mitigating SCOM vulnerabilities – Java, HSTS, ODBC


Knowledge Articles

How to Install Web Console from learn.microsoft.com for SCOM 2019, 2022

Holman’s SCOM quick start install guides for SCOM 2019, 2022

IIS Manager Authentication from learn.microsoft.com


Configuring SSL Certs and Smart Cards

Setup ‘SCOM WebConsole settings for secure authentication’, access, and rendering methods.  I’ve setup the web console role with defaults, then come back later.  Holman’s quick start lets you complete the role with default HTTP setup.  After that, we add an SSL cert for HTTPS.  Thirdly, employ aliases, or F5 load balancers to simplify user experience accessing the console.  Fourth, setup SmartCards to help secure, also Kerberos authentication/delegation. 


Part 1 – Start with the SSL certificate for https

Setup the ‘SCOM WebConsole settings for authentication’, beginning with a SSL certificate request for the server(s) in question.  Add any SAN names/aliases you want (if not load balanced).


NOTE:

Use CA Auto-Enrollment templates to simplify SSL request whenever an internal or external SSL certificate is required for your organization.  Generally, external certificates require manual effort executing the certreq script.


Sample SSL certificate

SCOM Web Console SSL Cert details


Less typing means less typos

Below SSL certificate example with any SAN names/aliases (if not load balanced).  Simplify the SCOM web console link to https://SCOM/ versus https://SCOMSERVERName/OperationsManager


IIS manager server certificates with SAN DNSName aliases included.


Part 2 – Add authentication Smart Card in IIS

Next! – I will set up SmartCard role in ‘SCOM WebConsole settings for authentication’.  Additionally, review the Learn.microsoft.com site for IIS here.

Compatibility

VersionNotes
IIS 10.0The <iisClientCertificateMappingAuthentication> element was not modified in IIS 10.0.
IIS 8.5The <iisClientCertificateMappingAuthentication> element was not modified in IIS 8.5.
IIS 8.0The <iisClientCertificateMappingAuthentication> element was not modified in IIS 8.0.
IIS 7.5The <iisClientCertificateMappingAuthentication> element was not modified in IIS 7.5.
IIS 7.0The <iisClientCertificateMappingAuthentication> element of the <authentication> element was introduced in IIS 7.0.
IIS 6.0The <iisClientCertificateMappingAuthentication> element replaces the IIS 6.0 IIsCertMapper metabase object.


Add the Client Certificate feature for the SCOM Web Console

Let’s add SmartCard authentication capability.


Open Server manager >

Open Server manager
Open Server manager


Click on Manage > Add roles/features (top right)

Scroll to the top right, and click on Manage, then 'Add Roles or features'
Scroll to the top right, and click on Manage, then ‘Add Roles or features’


Click Next twice to get to the Server Roles


Server Manager > Server Roles tab output

Server Manager > Server Roles


Expand Web Server drop down

SCOM Web Console Authentication installing Client Certificate Mapping role

Click the box to check ‘Client Certificate Mapping Authentication (Installed)’ and click Next twice (2) [ two times ]

Expand Server Manager > Web Server > Client Certificate Mapping Authentication

Expand Server Manager > Web Server > Client Certificate Mapping Authentication

Click Install (mine is greyed out as it’s enabled)

Server Manager Features Install


Allow install to complete, server will prompt if reboot required.

NOTE: Either way, reboot is required to apply new authentication method.


Validate IISManager after reboot

Click on Authentication to verify ‘Active Directory Client Certificate Authentication’ is present and enabled.

IIS Authentication with Client Certificate Authentication (after role installed)


After reboot, verify ‘AD Client Certificate authentication’ method is enabled and visible.


From IISManager > Server > Authentication > Verify method is there and enabled

IIS Authentication with Client Certificate Authentication (after role installed)


Verify Default Web Site Authentication setup

Verify Default Web site has Windows Authentication enabled.


Navigation steps:

IIS Manager > Expand Sites > Default Web Site > Authentication

Windows Authentication should be enabled, others disabled

Default Web Site Authentication showing Windows Authentication ONLY enabled

PowerBI May 2023 install

PowerBI time baby!

Time to update PowerBI Report Server to PowerBI May 2023 update/install for PowerBI Desktop and Report Server!


Do you use PowerBI to render monitoring insights from SCOM, SolarWinds, ACAS/Tenable, ForeScout or more?   In case you didn’t know, PowerBI Report Server is the on-premise solution where updates from the PowerBI Cloud Service make way to prem at least twice a year.  Time to update to ‘PowerBI May 2023’ when you’re air-gapped, or just NOT to the cloud.  This post is how to upgrade PowerBI Report Server and PowerBI Desktop to the latest version.  This has been a few iterations in progress, and I couldn’t find any blog showing how to update these components.  NOTE: MDE/Intune/MECM/EM tools can be used to package this easily enough, but it’s typically a very small subset of servers used.


Grab a snapshot of PowerBI Report Server and Desktop Before MSI update/install

Before we upgrade to ‘PowerBI May 2023 install’ MSI’s –

Open Control Panel > Programs and Features > Search for Report (and hit enter)

Windows Server, Control Panel, Programs and Features before install


Check PowerBI Desktop (shows before and after!)

Open Control Panel > Programs and Features > Search for ‘power’ (and hit enter)

PowerBI Desktop Windows Server, Control Panel, Programs and Features before install


Begin PowerBI Desktop update

Assuming you’ve downloaded the PowerBI updates and saved to relevant servers.  Check PowerBI blog here, PowerBI Report Server page for the latest version.

NOTE: The older PowerBI May2023 details and MSI download have been superseded – May 2024 download https://www.microsoft.com/en-us/download/details.aspx?id=105944


Open PowerShell (as Admin)

Type .\PBIDesktopSetupRS_X64.exe and hit enter

Note the Pop-up MSI installer

PowerBI Desktop and PowerBI Report Server from PowerShell, Windows Server, Control Panel, Programs and Features before install


Confirm EULA

Click ‘I Accept’ check box and then Next to continue Desktop install

PowerBI Desktop EULA


Confirm Desktop Path

I changed to secondary drive to NOT fill up C: boot disk

PowerBI Desktop May2023 update path


Click Next to begin install

Click Next to begin install

PowerBI Desktop May2023 Next

PowerBI Desktop May2023 Next


Click Finish

Click Finish to complete update

PowerBI Desktop May2023 Finish


PowerBI Desktop Reboot required prompts

PowerBI desktop prompted twice for reboot required

Click OK

PowerBI Desktop required reboot prompt first time

Prompted again for reboot

PowerBI Desktop required reboot prompt

Click OK


PowerBI Report Server update

Begin PowerShell window for PowerBI Report Server exe update


Check Version prior to install

Click on Start > Control Panel > Programs > Programs and Features

Type Report (and hit enter)

Verify version

PowerBI Report Server before update


PowerBI Report Server update

Check what’s installed before update

Check Control Panel > Programs > Programs and Features > Report (hit enter)

PowerBI Report Server updated


Begin Report Server install/update

From PowerShell as Administrator window > Type .\PowerBIReportServer.exe

Hit enter

NOTE: Similar popup output to PowerBI desktop pictured below

PowerBI Desktop and PowerBI Report Server from PowerShell, Windows Server, Control Panel, Programs and Features before install

PowerBI Desktop and PowerBI Report Server from PowerShell, Windows Server, Control Panel, Programs and Features before install

Choose Upgrade/Install PowerBI Report Server

PowerBI Report Server Upgrade/Install prompt

PowerBI Report Server Upgrade/Install prompt

Accept EULA

Click on ‘I accept’ radio checkbox

PowerBI Report Server EULA prompt


Report Server update installing

Watch while PowerBI Report Server updates

PowerBI Report Server Install progress


PowerBI Report Server reboot required

PowerBI Report Server prompts for reboot – ‘Restart required’

Click Close to reboot server

NOTE:  Optionally click on Restart.   Validate PowerBI Report server service is running via services.msc, and then check the PowerBI Report Server URL specified is functional.  This may still require server reboot! 

PowerBI Report Server Restart Required


Additional verification of PowerBI Report Server install

Verify PowerBI Report Server updated from Windows Control Panel

Click on Start > Control Panel > Programs > Programs and Features

Type Power (and hit enter)

Verify the version number matches (unfortunately, Report Server does NOT list the version in the title)

PowerBI Report Server update complete

Deciding ‘Event Collection vs. Alert’ rule

Question example of two cartoon people discussing something. Both have thought bubble cartoons looming overhead.


Ever run through an event log scenario deciding ‘event collection vs. alert rule’ is the way to filter out the needle from the haystack?   There’s a few ways to do this with Monitoring tools.   If you’re cloud centric, a KQL query (assuming you’re collecting the event logs, if you’re using Operations Manager (SCOM), there’s a few ways to consume the events.   SCOM ACS is basically a DB for collecting Security events, and typically is an unused feature in SCOM by most customers.  Kevin Holman’s had many blog posts for ACS, testing the filter, as well as a management pack (MP)  fragment (blog here, GitHub fragment library here).


Let’s walk through criteria deciding ‘event collection vs. alert rule’:

  1. Do the event(s) happen often?  If so, how often?
  2. Can you filter the event description to limit the amount of gathered event?
  3. Do you need match count or samples before action required?  (i.e. count x events in y time)
  4. Is there a regulatory or compliance requirement to collect every event?
  5. Is this something you want to visualize with PowerBI?
  6. For better visualizations, would the EventID help view/sort data in a tabular output?   i.e. Think PowerShell property) as well as TimeRaised/TimeGenerated, and Event Description


Example – DC Security events

When there is a regulatory requirement to collect events, we need to decide ‘event collection vs. alert rule, and IF we can filter for specific pieces of the event.  Holman has examples of alert parameters, and dynamic data, which are very useful to get the needles out of the haystacks.  Depending on your goals, use event parameters, or leverage CustomFields in the alert to build required fields.


Depending on the requirements, event collection is useful to collect related EventID’s with RegularExpressions.   Use Event rules WHEN action is required.  Leverage Regular expressions help filter what we collect (via event collection or alert rule.   By extension, utilize CustomFields in the alerts to help the presentation or SQL query towards a PowerBI report.


Let’s talk about regular expressions examples for rules (or monitors)


MatchesRegularExpression

<Expression>
<RegExExpression>
<ValueExpression>
<XPathQuery Type=”String”>EventDescription</XPathQuery>
</ValueExpression>
<Operator>MatchesRegularExpression</Operator>
<Pattern>^(Security ID:.*admin*)|^(Security ID:.*[des]a*)$</Pattern>
</RegExExpression>
</Expression>

<Expression>
<RegExExpression>
<ValueExpression>
<XPathQuery Type=”UnsignedInteger”>EventDisplayNumber</XPathQuery>
</ValueExpression>
<Operator>MatchesMOM2005BooleanRegularExpression</Operator>
<Pattern>^(4625|4740)$</Pattern>
</RegExExpression>
</Expression>


Contains example

<Expression>
<RegExExpression>
<ValueExpression>
<XPathQuery Type=”String”>EventDescription</XPathQuery>
</ValueExpression>
<Operator>ContainsSubstring</Operator>
<Pattern>Proactive DailyTasks ADDS Monitors close automation for</Pattern>
</RegExExpression>
</Expression>

<Expression>
<RegExExpression>
<ValueExpression>
<XPathQuery Type=”String”>Params/Param[2]</XPathQuery>
</ValueExpression>
<Operator>ContainsSubstring</Operator>
<Pattern>dnsserver</Pattern>
</RegExExpression>
</Expression>


DoesNotContain example

<Expression>
<RegExExpression>
<ValueExpression>
<XPathQuery Type=”String”>EventDescription</XPathQuery>
</ValueExpression>
<Operator>DoesNotContainSubstring</Operator>
<Pattern>None</Pattern>
</RegExExpression>
</Expression>

Holman MP Fragment example of specific EventID:

<Rule ID=”Rule.StateChangeAlerts” Enabled=”true” Target=”SCOMMagementServer.Class” ConfirmDelivery=”true” Remotable=”true” Priority=”Normal” DiscardLevel=”100″>
<Category>EventCollection</Category>
<DataSources>
<DataSource ID=”DS” TypeID=”Windows!Microsoft.Windows.EventCollector”>
<ComputerName>$Target/Host/Property[Type=”Windows!Microsoft.Windows.Computer”]/NetworkName$</ComputerName>
<LogName>TestAPP</LogName>
<AllowProxying>false</AllowProxying>
<Expression>
<And>
<Expression>
<SimpleExpression>
<ValueExpression>
<XPathQuery Type=”UnsignedInteger”>EventDisplayNumber</XPathQuery>
</ValueExpression>
<Operator>Equal</Operator>
<ValueExpression>
<Value Type=”UnsignedInteger”>600</Value>
</ValueExpression>
</SimpleExpression>
</Expression>
<Expression>
<SimpleExpression>
<ValueExpression>
<XPathQuery Type=”String”>PublisherName</XPathQuery>
</ValueExpression>
<Operator>Equal</Operator>
<ValueExpression>
<Value Type=”String”>APP Test Log Monitoring</Value>
</ValueExpression>
</SimpleExpression>
</Expression>
</And>
</Expression>
</DataSource>
</DataSources>
<WriteActions>
<WriteAction ID=”CollectToDB” TypeID=”SC!Microsoft.SystemCenter.CollectEvent” />
<WriteAction ID=”CollectToDW” TypeID=”SCDW!Microsoft.SystemCenter.DataWarehouse.PublishEventData” />
</WriteActions>
</Rule>


Lastly, let’s talk about the use of CustomFields to add additional data to the alert, but NOT in the event description (Holman’s blog here)

For the tabular view of alert data (from PowerShell as with SQL query of Alerts view, we might need to display the data, such as EventDisplayNumber, TimeRaised, Message, (alternate is Parameters, or UnformattedDescription).  Additionally, check alert output details, from the SCOM MS in PowerShell via get-SCOMAlert -name “MonitorDisplayNameHere” | fl | more


Leverage Custom Fields to add

EventID       $Data/EventDisplayNumber$

Event Category    $Data/EventCategory$


Happy Authoring!


Additional links

How to collect events – but not ALL the events?


https://learn.microsoft.com/en-us/answers/questions/69667/scom-event-collection-rule

Positive SSL by Comodo SSL

SCOM Snapshot Synchronization alerts

Synchronized Swimmers

Updated 4 Apr 2023 with Tyson’s feedback!


First, some background – the Snapshot Synchronization alert just tells you there was a SQL issue running the workflow.

Second, the Snapshot Synchronization alert from a health model perspective, is NOT a critical issue (outage).  Create override severity to 1 (warning) to prevent false wake-up calls.  I’ll get this to my GitHub repo shortly!


Let’s troubleshoot the alert

Start with Tyson’s SCOM Maintenance pack, and run the tasks

Tyson’s SCOM Maintenance pack tasks


Alternative long steps

Login to server with SSMS installed –

Open SSMS > Connect to the SCOM OpsMgr DB > Click on New Query

***NOTE verify database dropdown shows Operations Manager!

Paste SQL query into the query textbox

Select WorkItemName, b.WorkItemStateName, ServerName, StartedDateTimeUtc, CompletedDateTimeUtc, DurationSeconds, ERRORMESSAGE
from cs.WorkItem a , cs.WorkItemState b
where a.WorkItemStateId= b.WorkItemStateId
and WorkItemName = ‘SnapshotSynchronization’

Screenshot

Snapshot Synchronization alert query


Example SQL Output

SQLQueryExecution

WorkItemName WorkItemStateName ServerName StartedDateTimeUtc CompletedDateTimeUtc DurationSeconds ERRORMESSAGE
SnapshotSynchronization Succeeded SCOMV01 2023-01-24 00:26:23.427 2023-01-24 00:27:46.100 83 NULL
SnapshotSynchronization Failed SCOMV02 2023-01-25 00:27:52.363 2023-01-25 00:28:07.520 15
SnapshotSynchronization Succeeded SCOMV00 2023-01-25 21:43:36.540 2023-01-25 21:45:07.947 91 NULL
SnapshotSynchronization Running SCOMV00 2023-01-25 21:45:32.227 NULL NULL NULL

Solution:
The jobs may show Succeeded by the time you login to SQL = EOJ (end of job)

If Failed is latest date/timestamp, re-run the task “Request Snapshot Synchronization” which can be found when we select  “Management Configuration Service Group” in the below mentioned view.

View:

From Monitoring Tab > Click on Operations Manager folder > Click on Management Group Health widget > Highlight unhealthy state from Management Group Functions.

Click on the ‘Request Snapshot Synchronization’ task to execute the Stored Procedure “SnapshotSynchronizationForce” on the OpsMgr DB.


NOTE: There are two tasks with same name but with different targets i.e. ‘Management Configuration Service Group’ and ‘Management Configuration Services’


The other task can be found on below view after selecting the Management Server you want the Task to be executed on

View:

From Monitoring Tab > Expand Operations Manager folder > Expand Management Configuration Service folder > Click on Services State view


Create Override for the alert

To change snapshot monitor to warning

From SCOM Console > Authoring Tab

Expand ‘Management Pack Objects’ > Click on Monitors

In the ‘Look for:’ bar type Snapshot synchronization state and hit enter

Monitor name = Snapshot synchronization state

Right click on monitor > Overrides > Override the monitor > For all objects of class

Click checkbox for Severity > change Critical to Warning

Click Edit – add comment – i.e. date/time changing to warning

Select your override pack > Click OK

Click OK to execute change

Override snapshot monitor to warning


Resources

Tyson’s MonitoringGuys blog for SCOM Maintenance pack – download here

Link to TechNet article


What’s my path again?

Say what? What's my path again
Say What

What’s my path again?   Why did my command fail?

Ever get ‘command not found’ errors when calling a command on a machine?  Many times, these errors are related to what is defined on said machine.   So with monitoring tools like SCOM, ALA, Azure Automation, BMC Patrol, the ID used in monitoring rely on filepaths defined on the local server (holds true for Windows/UNIX).  Because sometimes even ls, awk, dir, etc. if their various bin directory filepaths are NOT specified as a security hardening measure.  The result of STIG/Security hardening is ALL scripts/commands require a fully qualified filepath.

Fully qualifying command paths holds true for Windows and UNIX, from generic OS commands, AND also application specific files (including an executable).  Updates are required if you want to supply the short name command.  Add the full filepath to PATH= statement.  The alternative is to fully qualify in your SCOM mgmt. pack, so the command will run regardless of user, as long as the path is correct.


Check for specified shell

First, let’s check UNIX to see what shell is specified for user(s).

Second, log into your UNIX server, and check files type:  ls -al .* | more  

Use ls -al | more to see what PATH files are in the user directory

Third, another option with less output

example:  ls -al .*profile

What's my path? Use command ls -al .*profile to find which profile(s) exist
What’s my path? Use command ls -al .*profile to find which profile(s) exist


Fourth, Look for the shell defined for the user account

On my server, SCOM user is bash shell (but I do NOT have a .bash_profile, only a .profile (also note NO .ksh_profile) )   Knowing what profiles are configured for user account will help define what is inherited from the OS, (automatically included).  Leverage when calling commands in your management packs for custom rules/monitors.


In conclusion, if executable is NOT in the filepath variable, you have two ways to resolve the issue:

  1. Create a .bash_profile
  2. Call bash/ksh shell in your script or command line:   bash; <commandhere>


To check path:

UNIX $PATH vs. Windows $ENV:path

UNIX example – ‘echo $PATH’ from UNIX ssh session/logon

What's my path again? Use echo $PATH
UNIX what’s my path? Use echo $PATH


Windows PowerShell example

What's my path? Windows PowerShell example of $PATH
What’s my path? Windows PowerShell example of $PATH


Here’s my .profile that sets up SCOM user (only /bin shown)

What's my path? Use UNIX .profile to find PATH
What’s my path? Use UNIX .profile to find PATH


Here’s a UNIX .profile example:

https://www.unix.com/unix-for-dummies-questions-and-answers/21995-basic-profile-setup.html

Example

set PATH=$PATH:/usr/homes/myhome/sqlldr:/appl/oracle/product/9.2.0/bin

Which subscription was the trigger?

Hello Again,

Surprise!

I am back, as a rusty nail, and back to make lemonade from lemons!

Rusty Nail through Lemon

Rusty Nail through Lemon


Ever run into an email you don’t want to get, but have difficulty finding

the subscription entry?


Do you get a subscription Email, and that channel has the Notification ID, but you’re not sure what subscription sent the alert email?


Let’s start with the notification email

Example

Notification subscription ID generating this message:

{AA0C1081-D04F-F5CA-DEB7-92B9ECA619E2}


On SCOM MS > Open PowerShell

Get-SCOMNotificationSubscription


Example

PS C:\windows\system32> Get-SCOMNotificationSubscription -ID

“BD52BB72-3FDE-9D7F-6214-B9A47A311896”


Configuration     :

Microsoft.EnterpriseManagement.Administration.AlertChangedSubscriptionConfiguration

ManagementGroup   : SCOMTestLab

Name              : Subscription168e29fd_a8e5_4ee4_956f_d9591b845475

DisplayName       : AD DailyTasks Report

Description       : +CRITERIA = Alert Name Contains ‘Proactive DailyTasks AD

Team Report’     +RESOLUTIONSTATE = (0)

New    +SUBSCRIBERS = AD team, USER Kevin Justin via EMAIL     +CHANNEL = SMTP Email

Actions           : {SMTPAction_a6a5314d_83f5_47c0_910a_e60040b4c808}

ToRecipients      : {USER <blank> via EMAIL, USER <blank> via EMAIL, USER

<blank> via Email, USER <blank> via EMAIL…}

CcRecipients      : {}

BccRecipients     : {}

Enabled           : True

Id                : bd52bb72-3fde-9d7f-6214-b9a47a311896

ManagementGroupId : 001b9265-3c9f-816c-aa36-a8687c05be8e


Get-SCOMNotificationSubscription | ? { $_.ID -eq

“BD52BB72-3FDE-9D7F-6214-B9A47A311896” }


Example

PS C:\windows\system32> Get-SCOMNotificationSubscription | ? { $_.ID -eq “BD52BB72-3FDE-9D7F-6214-B9A47A311896” }

Configuration     :

Microsoft.EnterpriseManagement.Administration.AlertChangedSubscriptionConfiguration

ManagementGroup   : SCOMTestLab

Name              : Subscription168e29fd_a8e5_4ee4_956f_d9591b845475

DisplayName       : AD DailyTasks Report

Description       : +CRITERIA = Alert Name Contains ‘Proactive DailyTasks AD

Team Report’     +RESOLUTIONSTATE = (0)

New    +SUBSCRIBERS = AD team, USER Kevin Justin via EMAIL     +CHANNEL = SMTP Email

Actions           : {SMTPAction_a6a5314d_83f5_47c0_910a_e60040b4c808}

ToRecipients      : {USER <blank> via EMAIL, USER <blank> via EMAIL, USER

<blank> via Email, USER <blank> via EMAIL…}CcRecipients      : {}

BccRecipients     : {}

Enabled           : True

Id                : bd52bb72-3fde-9d7f-6214-b9a47a311896

ManagementGroupId : 001b9265-3c9f-816c-aa36-a8687c05be8e


Update the subscription

Depending on the subscription criteria, you may need to adjust the classes, or rules/monitors, or even the criteria (properties)


Example

Using Subscription Description for more details into what is filtered, who alert is delivered to, and the channel used

SubscriptionDescription


Example

Expanding Subscription Criteria to see details into what criteria is filtered for subscription

SubscriptionCriteria

SubscriptionCriteria

See previous blogs for the best practice / how to set up subscriptions to show useful data without all the clicks

Subscription set up guide

Docs article How to Create Notification Subscriptions | Microsoft Docs

SCOM 2016 web console hot fix released

Burglar stealing a monitor
Security hotfix for SCOM 2016 web console released before your information is stolen

SCOM 2016 web console hot fix

Security teams may be contacting you for CVE-2020-1331 vulnerability on the 2016 web console.  In my example, the Tenable scanner listed ALL SCOM management group servers – under SCOM2016/2019).

NOTE KB does not install on server, so does not show up under ‘Installed Updates’


Background

HotFix DLL comes with a readme to replace the DLL for the SCOM 2016 WebConsole role

If you don’t already know this, the roles each get their own directory on your SCOM server

Security scanners run scripts to help validate if system is vulnerable.  It is possible that the scanner is just looking for some string for the install of SCOM, NOT the actual role that is vulnerable.


SCOM 2016 typically installs @ (‘\Program Files\Microsoft System Center 2016’)

SCOM 2019 typically installs @ (‘\Program Files\Microsoft System Center’)


Identify SCOM roles

Open PowerShell window to identify roles

cd “D:\Program Files\Microsoft System Center 2016\Operations Manager”


Resolve Web Console vulnerability

High level steps

Download the KB here

Execute KB

Copy dll and readme file

Backup DLL and replace

Reboot server

Contact Security Team to re-scan server


Mitigate vulnerability

Download the KB here

Extract downloaded the KB

Click Run to extract, and list extraction path

Click Run for Security Warning pop-up

Copy Windows Explorer Path you want to extract to, and paste in the path

Example

S:\MonAdmin\MSDN images\SCOM\2016\WebConsole HotFix

Enter path to extract Hot Fix
Extract Hot Fix


Copy current DLL & replace with hotfix DLL

Open PowerShell window (as admin)

# Backup DLL

# Change Drive letter if you hopefully installed SCOM on D: drive (non-system drive)

copy “C:\Program Files\Microsoft System Center 2016\Operations Manager\WebConsole\MonitoringView\bin\Microsoft.EnterpriseManagement.OperationsManager.MonitoringViews.dll”  “C:\Program Files\Microsoft System Center 2016\Operations Manager\WebConsole\MonitoringView\bin\Microsoft.EnterpriseManagement.OperationsManager.MonitoringViews-old.dll”

# Replace DLL

copy “C:\MonAdmin\Microsoft*.dll” “C:\Program Files\Microsoft System Center 2016\Operations Mana
ger\WebConsole\MonitoringView\bin”


# Verify

cd “D:\Program Files\Microsoft System Center 2016\Operations Manager\WebConsole\MonitoringView \bin”

gci Microsoft.EnterpriseManagement.Operations*.dll


Sample screenshot from Windows Explorer view of Bin directory for replaced DLL – Same size, only timestamp changes July Page 4

Windows Explorer window showing DLL's
Windows Explorer window showing DLL’s

Reboot server


Test WebConsole functionality

Verify from SCOM Console > Administration Tab > Settings > Web

Find Console URL
Find Console URL

Example

http://16ms01/OperationsManager


Contact Security Team to re-scan SCOM asset(s)


References

CVE-2020-1331 https://portal.msrc.microsoft.com/en-US/security-guidance/advisory/CVE-2020-1331


Microsoft Support article

https://support.microsoft.com/en-us/help/4566040/prevent-javascript-injection-in-operations-manager-2016-web-console

Tenable forum post https://community.tenable.com/s/question/0D53a000074LGapCAG/plugin-137369-security-updatesfor-microsoft-system-center-operations-manager


ADCS – Active Directory Certificate Services Addendum pack

Time to talk Certificates!
Certificate of Achievement


Hello again, it’s time to talk about ADCS – Active Directory Certificate Services Addendum!


First, I’d like to call out Bob Williams and Vance Cozier for their help and expertise!

SCOM-ADCS-Addendum download


Background

ADCS is Active Directory Certificate Services, or what we would know as a Certificate Authority.  The goal was to improve the pack, because the focus is on how important certificates are to a modern enterprise.  Let’s begin the Active Directory Certificate Services Addendum pack review.

Collaboration

In this paragraph, let’s talk through the Certificate Services packs for 2016+, and how we as Microsoft consultants, and field engineers, recommend changes to the pack.  First, for some background, the collaboration process gets a better result improving Microsoft products.   Second, the collaboration result can vary.  Third, collaboration input can be based on customer input, or field engineer experience.  Most importantly, this is how we ‘would have liked’ the pack to work.


AD Certificate Services Monitoring

The Certificate services pack alerts on events/services.  Therefore, the pack does NOT monitor the SCEP URL.  For instance, a transaction web monitor was added.   The collaboration effort was focused on improving the ADCS pack, resulting in the creation of the Active Directory Certificate Services Addendum and customizations packs.


Download File

Let’s delve into the download file

SCOM-ADCS-Addendum download


Review file contents

  • Download.txt (in case you need to find it later!)
  • Version.Info.txt (MP version history, what was added & when)
  • XLS MP export of rules/monitors
  • ADCS Addendum & Customizations packs


References

Configuring Certificate Services docs site

ADCS download

Management Pack wiki

Need to find the command UNIX pack runs for perf counter

Magnifying Glass


Have you ever needed to find the command UNIX pack runs for perf counter?   Say the processor time value doesn’t match what the Unix admin may be saying SCOM is showing.


Many times you can look at the SCOM management pack, and those commands trace back to the UNIX library.


Background:  The SCOM management server runs many of the cross-plat/xplat workflows to the UNIX agent through WinRM.


Agenda
  1. Unseal SCOM UNIX management pack to obtain URI
  2. Understand command line options from UNIX/Linux side, and how to view the output
  3. Enumerate command line
  4. Test Command line from SCOM MS


Unseal SCOM UNIX management pack

The screenshot below is unsealing the Solaris10 pack to XML, and then viewing/searching to show the processor reference.

Solaris 10 processor rules

NOTE that’s a URI, not a script


How UNIX admin may supply processor output

Example – Unix admin typically uses vmstat or iostat.


The screenshot uses ‘vmstat 2 10‘ – a snapshot every 2 second intervals, 10 times

vmstat output


We can discuss the vmstat output, but it shows way more than just processor (ready queue, swap, user, system, and cpu %) to help figure out which operating system component is the problem.


Enumerate command line test

How do we test the command line syntax, to verify what SCOM pulls when running the rule?

For example, we need to make the URI actionable from the management pack.  What is needed to make a usable command?


Grab the URI from the pack

http://schemas.microsoft.com/wbem/wscim/1/cim-schema/2/SCX_ProcessorStatisticalInformation?__cimnamespace=root/scx


Because we know the URI, we now build out the syntax with WinRM

winrm enumerate http://schemas.microsoft.com/wbem/wscim/1/cim-schema/2/SCX_ProcessorStatisticalInformation?__cimnamespace=root/scx -auth:basic -remote:https://<servername>:1270 -username:<scomID, not necessarily root> -skipCACheck -skipCNCheck -skiprevocationcheck –encoding:utf-8


Test WinRM command from SCOM MS

For instance, we want to test the WinRM command from the MS to the UNIX server

winrm enumerate http://schemas.microsoft.com/wbem/wscim/1/cim-schema/2/SCX_ProcessorStatisticalInformation?__cimnamespace=root/scx -auth:basic -remote:https://ubuntu:1270 -username:scom -skipCACheck -skipCNCheck -skiprevocationcheck –encoding:utf-8


Example output

SCX_ProcessorStatisticalInformation
InstanceID = null
Caption = Processor information
Description = CPU usage statistics
ElementName = null
Name = 0
IsAggregate = FALSE
PercentIdleTime = 99
PercentUserTime = 0
PercentNiceTime = 0
PercentPrivilegedTime = 0
PercentInterruptTime = 0
PercentDPCTime = 0
PercentProcessorTime = 1
PercentIOWaitTime = 0

SCX_ProcessorStatisticalInformation
InstanceID = null
Caption = Processor information
Description = CPU usage statistics
ElementName = null
Name = _Total
IsAggregate = TRUE
PercentIdleTime = 99
PercentUserTime = 0
PercentNiceTime = 0
PercentPrivilegedTime = 0
PercentInterruptTime = 0
PercentDPCTime = 0
PercentProcessorTime = 1
PercentIOWaitTime = 0


Additional references for WinRM syntax and troubleshooting

Warren’s blog

Docs site

Use Unix MP’s for shell commands


OMSAgent FluentD debunked – Configure Linux FluentD – part2

Are you stoked and fired up to Configure Linux FluentD - part2 !?

Now to begin – OMSAgent FluentD debunked

Configure Linux FluentD – part2 –> see part one (1) here)


First, my thanks to Mike Johnston@Microsoft (CSS SEE SME) to help validate my steps and testing, to configure Linux FluentD on an Ubuntu server!  Are you ready to bust a myth – OMSAgent FluentD debunked


If you’re starting fresh, or just joining, start with Part 1.  And Part 1 configures packs and assumes SCOM agent is installed and working.  Because it’s time to use the feature, we need to get the agent configured and tested.


Part one (1) quick summary

    • Verify pre-reqs – SCOM Linux Management packs for Linux/Universal Linux (2019 @ 10.19.1082.0), UNIX/Linux Log File monitoring (2019 @ 10.19.1008.0)
    • Linux server has SCOM Agent installed, configured, and updated (sudoers configured) – GUI blog here
    • Use docs.microsoft.com article


Load Sample Log monitoring pack

This piece is missing in the doc, but the content development team has this covered in a subsequent docs article.  We need to load a sample log monitoring pack to the SCOM management group, so we can test functionality.

Configure FluentD part 2 - This is a picture of the SCOM console GUI showing the OMED pack installed from the Admin tab > Management Packs > Installed Management Packs > with omed in the 'look for:' bar

Grab the file here, otherwise you can copy/paste from the docs article pretty easily.


Verify OMED service running on Management Server

It’s now time to enable the OMED service on the management server, and we can start with the docs subsection

Navigation steps from SCOM console (GUI)

    1. From the Operations console, go to Monitoring>Operations Manager>Management Server>Management Servers State.
    2. Select the management server in the Management Servers state.
    3. From Tasks, select Health Service Tasks>Enable System Center OMED Server


Steps to set/start service PowerShell (as admin)

# Verify service startup type is automatic

get-Service OMED | select -property Name,Starttype

# Example output

PS C:\Users\admin> Get-Service OMED | select -property name,starttype
Name StartType
—- ———
OMED Automatic

# Set startup type


# Start OMED service on SCOM management server (MS)

start-service OMED


Now we’re ready to test the UNIX agent!


Configure SCOM/OMSagent on Linux server

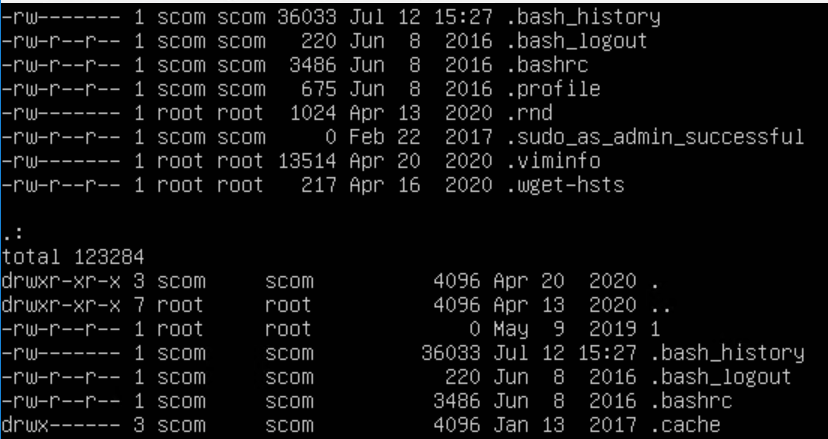
And now it’s time to switch to the agent side.  I’m assuming that you’ve already configured the SCOM agent on the Linux server.  So it’s time to verify the SCOM and OMSAgent is configured and working.  Let’s go back to the docs subsection for our sanity check, because we need to create folders, and set ownership, etc.


Create files and set permissions
mkdir /etc/opt/microsoft/omsagent/scom/conf/omsagent.d
mkdir /etc/opt/microsoft/omsagent/scom/certs
mkdir /var/opt/microsoft/omsagent/scom/log
mkdir /var/opt/microsoft/omsagent/scom/run
mkdir /var/opt/microsoft/omsagent/scom/state
mkdir /var/opt/microsoft/omsagent/scom/tmp
mkdir /home/omsagent/fluent-logging
# NOTE – This location is flexible for the path to use for log file position files
chown omsagent:omiusers state
chown omsagent:omiusers run
chown omsagent:omiusers log
chown omsagent:omiusers tmp
chown omsagent:omiusers /home/omsagent/fluent-logging

Verify SCOM certificate

Configuring FluentD requires the SCOM management server (MS) has signed the certificate on the UNIX server.  The docs article tells you to generate a new certificate for FluentD, which requires the management server.

Overview

Sign the certs on the agent > copy to MS > sign > copy back to agent

Step by step instructions
    1. Generate certs

/opt/microsoft/scx/bin/tools/scxsslconfig -c -g /etc/opt/microsoft/omsagent/scom/certs/

2. Rename certificates

cp -p omi-host-server.domain.pem to scom-cert.pem

cp -p omikey.pem to scom-key.pem


3. Copy certs to MS (sftp/ssh via WinSCP, or your app of choice)


4. Sign certs on MS via scxcertconfig -sign


Open PowerShell (as admin)

Go to your SCOM management server directory (hopefully d:)

cd ‘D:\Program Files\Microsoft System Center\Operations Manager\Server’

scxcertconfig -sign scom-cert.pem

scxcertconfig -sign scom-key.pem


5. Copy certs back to agent from MS (sftp/ssh via WinSCP, or your app of choice)


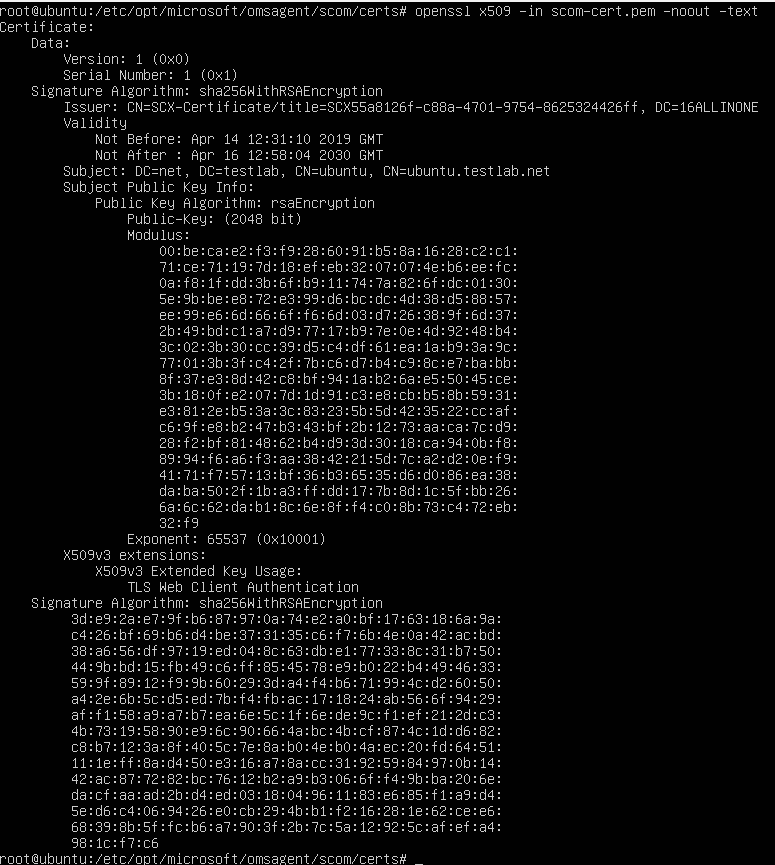
6. Verify the SCOM certificate shows your Management Server (MS) in the DC= line in the certificate

openssl x509 -in scom-cert.pem -noout -text

Verify SSL certificate - openssl syntax, verify the DC= portion is from the SCOM management server (MS)


7. Restart omsagent

As the ALLINONE server is one of my 2019 SCOM labs, I can verify that my cert is now signed by the management server (MS).  Time to load the certificate, and then restart the agent to see if we have any errors

# Restart Agent

/opt/microsoft/omsagent/bin/service_control restart


Verify omsagent.log errors

Verify any errors from the omsagent.log

Depending on where you are with your UNIX/Linux commands, this may help provide some context or use case examples.

My example –

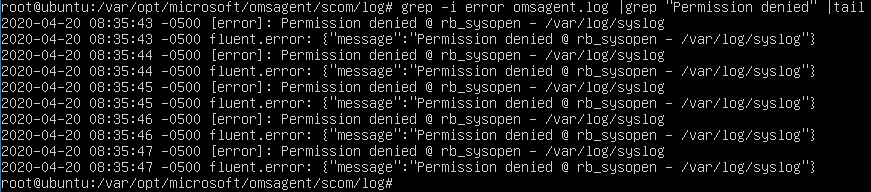
First error after restart was ‘permission denied’.   FluentD runs under the omsagent ID, and needs to have access to whatever log – at least read (4).  For the syslog example, I made omsagent the owner, and omiusers the group.   The smarter, security hat on, choice is to leave as root and make it read capable, or add omsagent to the root group

Configure FluentD part 2 - fluentd permission denied alerts on /var/log/syslog


Search /var/opt/microsoft/omsagent/scom/log/omsagent.log for errors.  Commands build on another, from simpler to more complex.  Don’t worry if UNIX/Linux is new, I’m all about examples, so hope that helps bridge the gap!


# Tail omsagent.log for progress

# Option 1 Continual output updates from file

tail -f /var/opt/microsoft/omsagent/scom/log/omsagent.log

# Option 2 – get last 10 lines

tail /var/opt/microsoft/omsagent/scom/log/omsagent.log


# Option 3 – get last 100 lines

tail -100 /var/opt/microsoft/omsagent/scom/log/omsagent.log

# Option 4 – Get a little fancier – search for a string

grep string /var/opt/microsoft/omsagent/scom/log/omsagent.log

# Option 5 – Specific example = error, case insensitive (-i)

grep -i error /var/opt/microsoft/omsagent/scom/log/omsagent.log


# Option 6 – egrep strings and -v to exclude what you don’t want to see

grep -i error /var/opt/Microsoft/omsagent/scom/log/omsagent.log |egrep -v “Permission denied|stacktrace”


Verify FluentD config files

Verify FluentD conf files and omsagent.conf has INCLUDE line

The INCLUDE lines allows a directory for a ‘Gold depot’ to control what log files are monitored on destination linux servers.  The goal is a standard repository (gold depot ) to simply copy the conf file you want for logfile/app/daemon, restart agent, and you’re off to the races monitoring that log file.


Verify omsagent.conf includes directory

grep -i include /etc/opt/Microsoft/omsagent/scom/conf/omsagent.conf

# If there’s output, make sure that omsagent.d path exists

# Verify permissions show omsagent:omiusers

ls -al /etc/opt/Microsoft/omsagent/scom/conf | grep omsagent


10. Back to step 8’s problem, to fix the FluentD conf files, so we can test!  Step 9 verified that FluentD is configured via the omsagent.conf, and also for specific configuration files (.conf) in omsagent.d directory.

ls -al output list of the omsagent.d directory and oms config specific files for various log files

Next, we need to restart the agent to verify configuration, and any errors are seen on the FluentD side.

My error for ‘out_scom’ plugin was already used by some other test conf files.

grep -i error /var/opt/Microsoft/omsagent/scom/log/omsagent.log |grep “Permission denied” |tail


Example of omsagent.log where we have traced an event for our mylog

OMSAgent FluentD debunked - omsagent.log permission denied opening logfile errors for /var/log/syslog

Mike explained that my error was due to having multiple FluentD conf files using the same buffer path for ‘out_scom’.  I searched the conf files to see who had ‘out_scom’ and removed one of my old test files from months back when I was testing the feature.

# Example of errors in the omsagent.log

Tail of the omsagent.log where we want to look for errors


Don’t forget to restart the omsagent for reading in the new file changes

# Restart Agent

/opt/microsoft/omsagent/bin/service_control restart


I’ll cover building a fluentd conf file in another blog post for brevity.


Time to test for alerts!

Time to test our FluentD conf file and append entries into the log file!

Starting simple again

# Options

echo test >> /var/log/mylog

echo 911 error >> /var/log/mylog

# Echo entries into test logfile to mimic syslog or messages

echo `date +”%b %e %H:%M:%S”` MYLOG 911 test string. Call 911

# Verify

tail /var/log/mylog

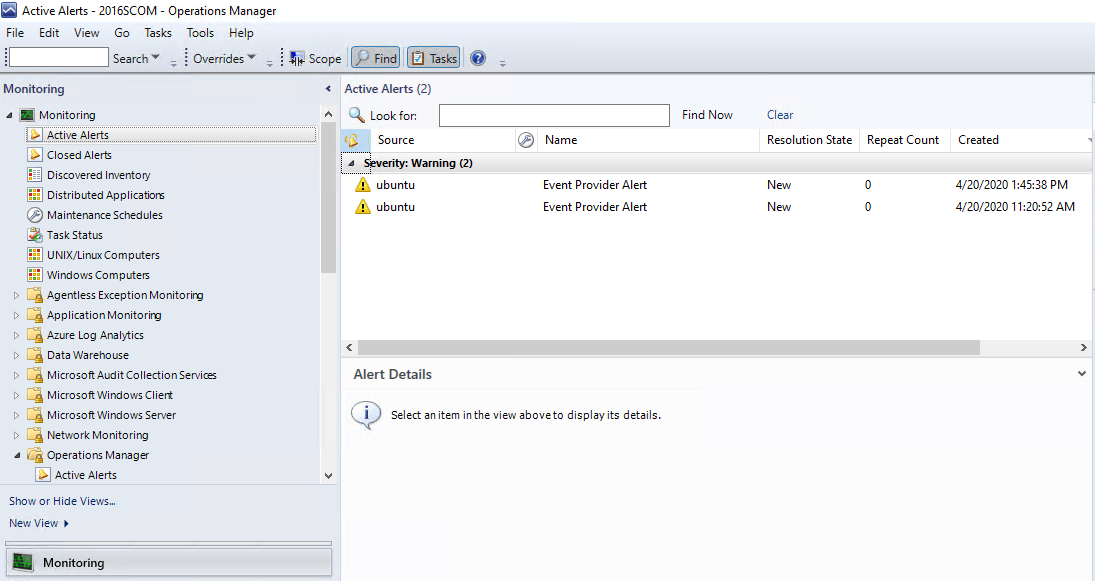
Switch over to SCOM management server, and look for alerts

Navigate to the Monitoring Tab > Active alerts

OMSAgent FluentD debunked - scom console alerts for fluentd test patterns


References for more information

In case you need a refresher on all the date options… Found CyberCiti FAQ helpful

Configure FluentD part 2 - output of the date command formatting like syslog or messages

All because the goal is to make the echo statement better for testing closer test/UAT examples on string matches, etc.

echo `date +”%b %e %H:%M:%S”` MYLOG 911 test string. Call 911

And what does it look like?

OMSAgent FluentD debunked - tail of created /var/log/mylog that shows various echo options